
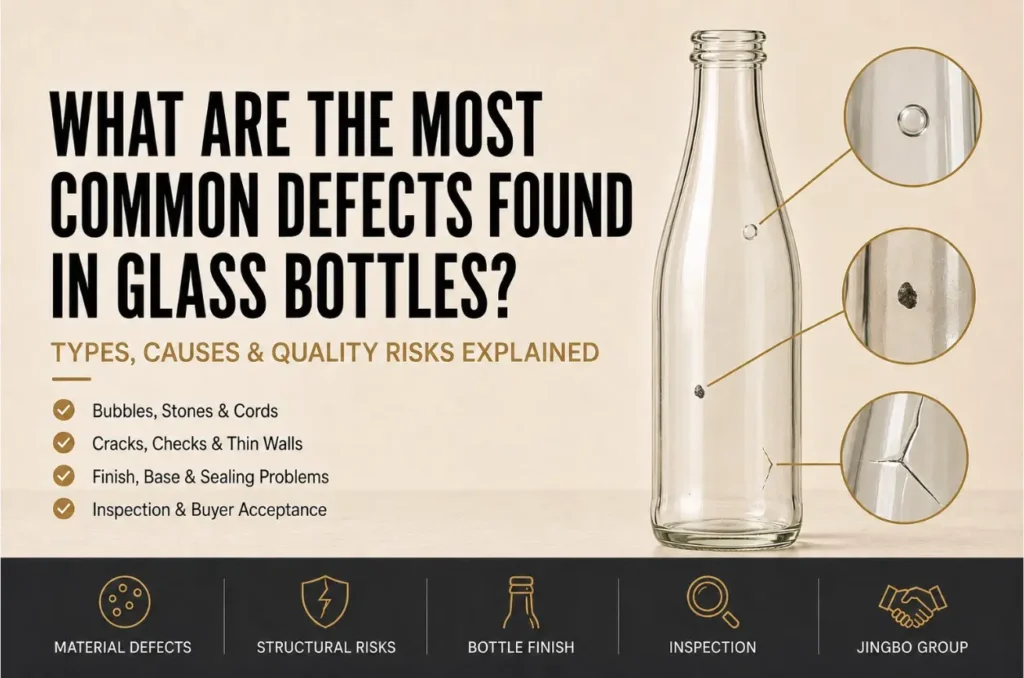
Os defeitos mais comuns nas garrafas de vidro incluem bolhas, protuberâncias, impurezas, cordões, fissuras, rachaduras, lascas, paredes finas, «bird swings», acabamentos malformados, distribuição irregular do vidro, corpos deformados, bases instáveis e tensão interna excessiva.
Nem todos estes defeitos apresentam o mesmo risco. Uma pequena bolha fechada pode afetar principalmente o aspeto. Uma fissura perto do fundo, uma superfície de vedação danificada ou uma saliência de vidro no interior da garrafa podem tornar o recipiente impróprio para o enchimento.
Alguns defeitos surgem durante a fusão das matérias-primas. Outros desenvolvem-se durante a moldagem, o recozimento, a inspeção, o transporte ou o enchimento. A gravidade destes defeitos depende do seu tamanho, forma, profundidade, posição e da utilização prevista da garrafa.
O que se considera um defeito numa garrafa de vidro?
Um defeito numa garrafa de vidro é uma irregularidade que afeta o aspeto, as dimensões, a limpeza, a capacidade de vedação, o desempenho mecânico ou a adequação da garrafa para o enchimento.
Os defeitos podem ser divididos em três grupos práticos.
| Grupo de defeitos | Exemplos típicos | Efeito possível |
|---|---|---|
| Cosmético | Pequenas bolhas fechadas, pequenos arranhões, ligeiras marcas de bolor, ligeira variação de cor | Altera a aparência ou a qualidade da decoração |
| Funcional | Garrafa inclinada, dimensões incorretas do gargalo, base instável, ovalidade excessiva | Afeta o enchimento, a colocação de tampas, a rotulagem, a embalagem ou o movimento da linha de produção |
| De natureza estrutural ou relacionados com a segurança | Fissuras, bolhas abertas, marcas de pássaros, saliências internas do vidro, fugas | Pode causar quebra, contaminação ou perda do produto |
Esta classificação é útil, mas não é universal. Um defeito que seja meramente estético num projeto pode ser inaceitável noutro. Uma pequena bolha pode ser tolerada numa garrafa de molho de cor âmbar, mas rejeitada numa garrafa de perfume transparente com uma grande área de exposição sem decoração.
Os sistemas de inspeção oficiais também classificam os defeitos de acordo com o risco. Por exemplo, o Manual do USDA sobre as condições dos recipientes para alimentos considera os balanços para pássaros e os recipientes partidos ou com fugas como elementos críticos no âmbito do seu sistema de inspeção de recipientes para alimentos. As fissuras, as zonas de espessura reduzida, as bolhas de grandes dimensões e as protuberâncias estruturais recebem classificações mais graves do que pequenas cavidades superficiais ou marcas visuais de menor importância.
Estas categorias do USDA não devem ser consideradas como uma especificação universal para garrafas. Elas ilustram por que razão o tipo e as consequências de um defeito são mais importantes do que o simples facto de uma marca ser visível.
ISO 7348 fornece terminologia normalizada utilizada no fabrico de recipientes de vidro. No entanto, os critérios de aceitação finais ainda têm de ser acordados entre o fabricante das garrafas, o comprador, a empresa de enchimento e qualquer laboratório de ensaios relevante.
Que defeitos de material aparecem no interior do vidro?
Alguns defeitos nos recipientes de vidro têm origem antes de a garrafa chegar ao molde. São causados por fusão incompleta, gás retido, matérias-primas contaminadas, partículas refratárias ou diferenças no vidro fundido.
Bolhas, sementes e ampolhas
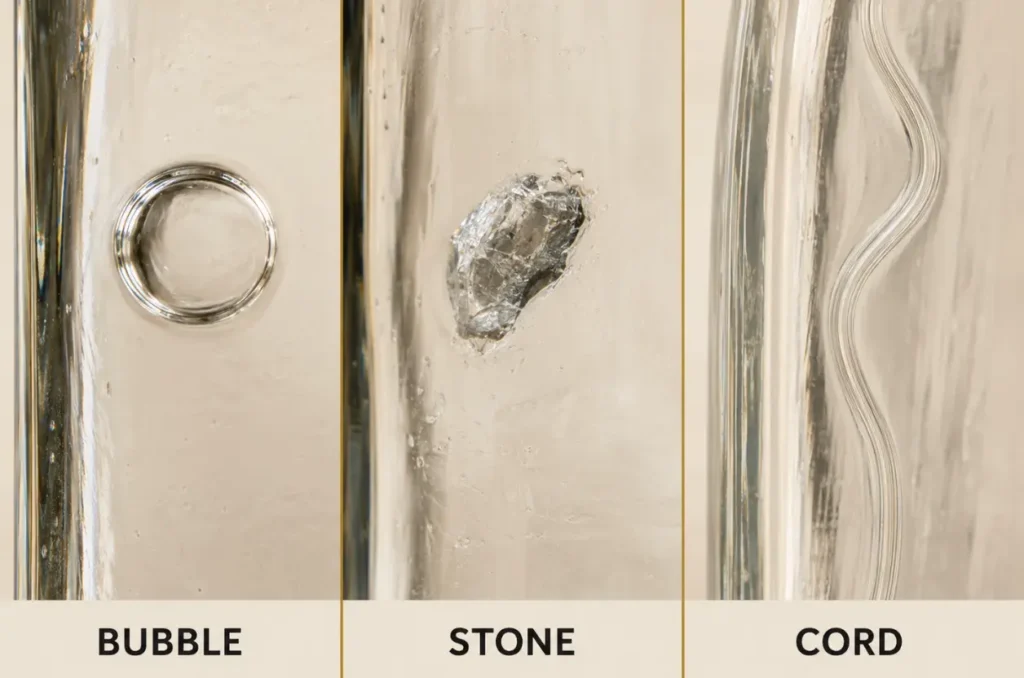
As bolhas são espaços cheios de gás retidos no interior do vidro. As bolhas muito pequenas são frequentemente designadas por «sementes», enquanto as cavidades maiores podem ser descritas como bolhas ou protuberâncias. A terminologia exata e os intervalos de tamanho podem variar consoante o fabricante.
A presença de uma pequena bolha redonda e totalmente fechada não significa, por si só, que a garrafa não seja segura. A sua aceitabilidade depende do seu diâmetro, forma, localização na parede, espessura do vidro circundante e dos requisitos visuais do projeto.
As bolhas longas ou alongadas requerem mais atenção. Podem criar uma secção fina ao longo da parede da garrafa. Uma bolha que atinja a superfície interior ou exterior pode transformar-se numa bolha aberta, deixando uma cavidade ou uma área rugosa.
As bolhas próximas da boca, do fundo, da base ou de uma parte naturalmente mais fina da garrafa podem ser mais graves do que as bolhas rodeadas por vidro distribuído uniformemente. São também mais visíveis em vidro transparente de alta qualidade do que em garrafas âmbar, verdes, revestidas ou com rótulos muito visíveis.
Pedras e outras inclusões sólidas
Uma pedra é uma partícula sólida retida no interior do vidro. Pode provir de material de mistura não totalmente fundido, de material refratário do forno, de vidro reciclado contaminado ou de outra substância estranha.
As pedras apresentam-se frequentemente como manchas opacas brancas, cinzentas, escuras ou cristalinas. Diferenciam-se das bolhas porque contêm material sólido em vez de gás.
Algumas pedras afetam principalmente a aparência. Outras podem criar um ponto de tensão local, uma vez que a inclusão e o vidro circundante podem comportar-se de forma diferente durante o arrefecimento. O risco depende do material, do tamanho, da posição e da utilização prevista da garrafa.
Uma pedra próxima da superfície, do acabamento, da base ou de uma parede fina merece mais atenção do que uma pequena inclusão isolada numa zona de baixa tensão. As garrafas destinadas a produtos gaseificados, ao enchimento a quente, à pasteurização ou ao uso repetido requerem normalmente uma análise mais rigorosa.
Cordões, estrias e linhas de fluxo
Os cordões e as estrias apresentam-se como áreas onduladas, semelhantes a fios ou estriadas no interior do vidro. Resultam de diferenças na composição, temperatura ou viscosidade do vidro que não foram completamente homogeneizadas antes da moldagem.
Um fio não é o mesmo que uma fissura. Normalmente, segue o fluxo do vidro e parece mover-se no interior da parede quando a garrafa é rodada à luz.
Os fios finos podem ser, sobretudo, uma questão estética. Os fios grossos podem distorcer a visão através da garrafa, fazer com que o vidro transparente pareça menos uniforme ou indicar uma diferença local na estrutura do vidro.
O nível exigido depende em grande medida do produto. As garrafas de vidro «flint» de alta qualidade, as garrafas de perfume e as garrafas transparentes para bebidas alcoólicas têm, normalmente, requisitos estéticos mais rigorosos do que as embalagens padrão para alimentos ou bebidas.
Quais são os defeitos estruturais mais graves nas garrafas de vidro?
Os defeitos estruturais interrompem a parede de vidro, criam uma zona perigosamente fina ou deixam vidro indesejado no interior do recipiente. Exigem mais cuidado do que as variações visuais comuns.
Verificações e fissuras
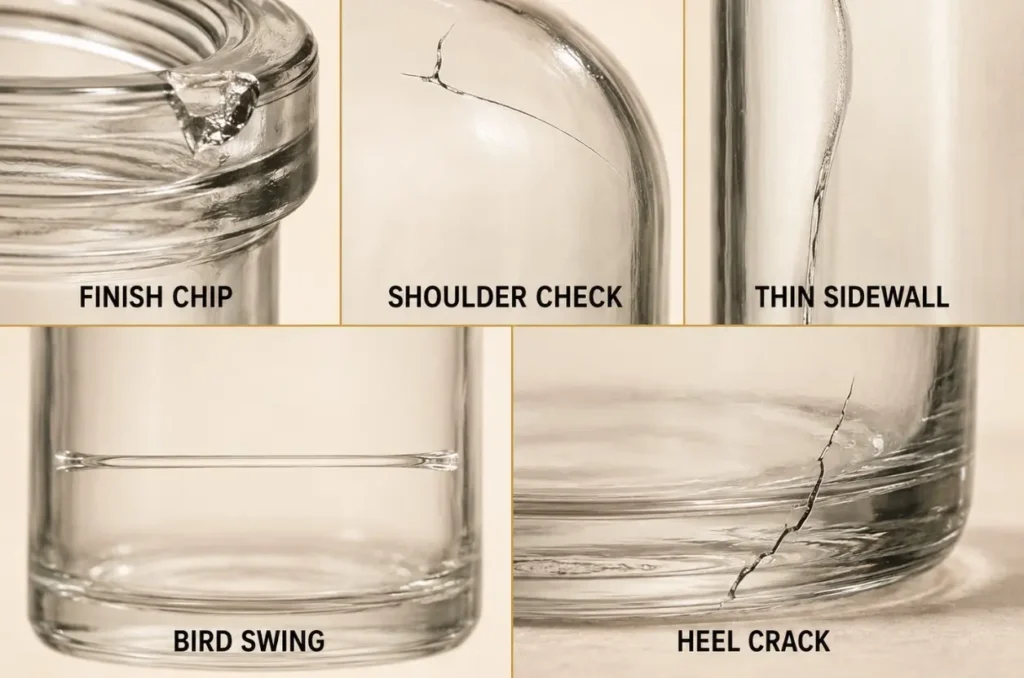
Uma fissura é uma pequena rachadura ou fratura parcial no vidro. Pode surgir à volta do acabamento, do anel do gargalo, do ombro, do corpo, do calcanhar, da base ou da costura do molde.
Algumas imperfeições são difíceis de detectar sob luz normal. Quando a garrafa é rodada contra um fundo claro, a imperfeição pode refletir a luz sob a forma de uma linha bem definida. Pode parecer mais brilhante e mais irregular do que uma junção normal do molde.
Uma fissura pode estender-se mais para o interior da parede de vidro ou atravessá-la. Qualquer uma destas situações pode reduzir a capacidade da garrafa de resistir a impactos, pressão interna, carga vertical ou variações de temperatura.
As verificações na zona do calcanhar e da base são especialmente importantes, uma vez que estas áreas sofrem impactos durante o transporte e a embalagem. As imperfeições detectadas na fase final de verificação podem agravar-se durante a colocação da tampa. As fissuras no ombro e na parede lateral podem alargar-se durante o enchimento, a pasteurização, o transporte ou o armazenamento do produto.
Uma fissura visível não deve ser considerada uma imperfeição estética aceitável. O frasco afetado deve ser retirado e o lote de produção em causa deve ser investigado, sempre que necessário.
Lasca e bordas danificadas
Uma lasca é uma área em que se partiu um pedaço de vidro. As lascas ocorrem frequentemente à volta do gargalo da garrafa, da superfície de vedação, da rosca, do pé ou da área de contacto com a base.
Uma pequena lasca externa numa zona sujeita a tensão pode ter uma classificação diferente de uma lasca na superfície de vedação. No entanto, o vidro solto ou parcialmente preso constitui sempre um risco de contaminação.
As lascas de acabamento são particularmente graves. Podem danificar o revestimento da tampa, impedir uma vedação fiável, provocar fugas ou libertar fragmentos de vidro durante o processo de colocação da tampa e de abertura.
As lascas na base podem tornar uma garrafa instável ou criar um novo ponto de origem de uma fratura. As lascas no talão podem alargar-se com o impacto. Qualquer lasca com uma aresta afiada, vidro solto ou ligada a uma fenda deve ser rejeitada.
Pontos mais finos e distribuição irregular do vidro
Uma garrafa de vidro não precisa de ter a mesma espessura de parede em todas as zonas. O ombro, o corpo, o calcanhar, a base e o gargalo utilizam, naturalmente, quantidades diferentes de vidro.
O problema surge quando uma zona fica significativamente mais fina do que o previsto no projeto aprovado ou quando a distribuição do vidro não é uniforme de um lado ao outro da garrafa.
Uma zona fina pode resultar de um peso incorreto da gota, de uma temperatura irregular da gota, de uma má formação da pré-forma, de diferenças no arrefecimento do molde ou de condições de sopro instáveis. Pode apresentar-se como uma mancha clara, uma distorção ou uma área com um aspeto invulgarmente flexível quando inspecionada com equipamento adequado.
Uma distribuição desigual também pode deixar uma quantidade excessiva de vidro noutra parte da garrafa. Uma garrafa pode cumprir as especificações relativas ao peso total e, mesmo assim, apresentar uma secção fina e frágil. Por conseguinte, o peso da garrafa, por si só, não é prova de que o vidro tenha sido distribuído corretamente.
As paredes finas são motivo de maior preocupação em garrafas expostas à pressão de carbonatação, enchimento a quente, choque térmico, empilhamento vertical intenso ou manuseamento repetido.
Balanços em forma de pássaro, pontas e saliências internas de vidro
Um «swing» de pássaro é uma faixa ou ponte de vidro que se estende pelo interior de uma garrafa. Pode ligar duas paredes laterais ou ligar a parede à base.
Uma ponta é uma saliência pontiaguda de vidro no interior do recipiente. Partículas de vidro presas ou aletas internas podem representar um risco semelhante.
Estes defeitos podem interferir com a lavagem, o enchimento ou o fluxo do produto. Mais importante ainda, a saliência pode partir-se e transformar-se em fragmentos de vidro soltos no interior da embalagem.
As saliências em forma de asa e os espigões internos não são variações normais de aspeto. As garrafas que os apresentem devem ser rejeitadas. A sua presença pode também exigir uma investigação das condições de moldagem e do equipamento de inspeção.
Pequenos orifícios e fugas
Um orifício é uma abertura muito pequena na parede da garrafa. Pode ser difícil de ver, mas pode permitir que o produto, o gás ou a pressão de vácuo escapem.
Uma garrafa com fuga pode molhar a embalagem de cartão, danificar os rótulos, contaminar as unidades vizinhas ou provocar a perda de gás. Nas embalagens de alimentos submetidos a tratamento térmico, uma fuga também pode comprometer a estanqueidade da embalagem.
A deteção de fugas pode exigir métodos de inspeção automatizados, tais como métodos de pressão, vácuo, elétricos ou outros. Uma garrafa que pareça normal por fora pode, mesmo assim, apresentar uma abertura muito pequena.
Que defeitos ocorrem na zona do gargalo e da boca da garrafa?
O acabamento é a parte superior da garrafa onde se encaixam a tampa, a rolha, a bomba, o conta-gotas, o pulverizador ou outro tipo de fecho. Pequenos erros dimensionais nesta área podem causar grandes problemas na linha de enchimento.
Um acabamento lascado ou rachado pode impedir a vedação e provocar a libertação de vidro durante a aplicação do fecho. Um acabamento incompleto faz com que falte parte da forma pretendida do vidro. O excesso de vidro pode criar uma área de vedação espessa, irregular ou distorcida.
Um acabamento não circular pode impedir que uma tampa de rosca ou um revestimento de vedação assente uniformemente. Um acabamento inclinado pode causar uma pressão de vedação irregular. Uma geometria incorreta da rosca pode levar a encravamento da rosca, baixo binário, binário excessivo, fugas ou danos na tampa.
O diâmetro interno obstruído ocorre quando o excesso de vidro bloqueia parcialmente a abertura da garrafa. Pode interferir com os tubos de enchimento, a inserção da rolha, os conta-gotas, as bombas ou a distribuição do produto. Um diâmetro interno demasiado grande pode criar um problema diferente, ao não proporcionar um ajuste adequado do fecho.
A superfície de vedação superior deve também permanecer suficientemente plana e uniforme. Isto é particularmente importante no caso de frascos com tampas de vácuo e de garrafas com fechos com revestimento interior.
A garrafa e a tampa devem ser avaliadas como um único sistema. Não se pode partir do princípio de que uma tampa que funciona numa abertura específica funcione noutra garrafa, simplesmente porque ambas as aberturas são descritas com o mesmo diâmetro aproximado.
Quando é que a forma da garrafa se torna um defeito funcional?
Uma forma invulgar da garrafa não constitui, por si só, um defeito. Garrafas cónicas, garrafas achatadas, corpos assimétricos, superfícies facetadas, ombros largos, cinturas estreitas e perfis esculpidos podem todos ter sido concebidos intencionalmente para criar uma identidade de marca distinta.
Estas garrafas podem exigir moldes personalizados, embalagens específicas ou ajustes no equipamento da linha de enchimento. Isso não significa que o design seja defeituoso. No caso de uma garrafa de vidro personalizada, o desenho técnico aprovado, a amostra confirmada, os requisitos de enchimento e o plano de embalagem definem qual deve ser a forma correta.
Um problema de forma torna-se um defeito funcional quando a garrafa fabricada difere do projeto aprovado, não se enquadra nas tolerâncias dimensionais acordadas ou não consegue desempenhar a função de embalagem pretendida.
Geometria personalizada ou deformação involuntária?
Uma garrafa cónica é um exemplo claro de geometria intencional. O seu corpo cónico pode parecer muito diferente de uma garrafa cilíndrica normal, mas ainda assim consegue manter-se estável, ser enchida com precisão, ser selada corretamente e circular em segurança ao longo do processo de produção.
O ângulo de conicidade, a capacidade, a distribuição das paredes, o diâmetro da base, a posição de acabamento e o centro de gravidade devem ser tidos em conta durante o desenvolvimento. Quando estas características correspondem ao projeto aprovado, a forma não constitui um defeito.
A deformação não intencional é diferente. Uma garrafa redonda pode tornar-se mais oval do que o permitido. Uma garrafa quadrada pode ficar com os cantos torcidos. Um painel plano pode ceder para dentro ou protuberar para fora. Uma garrafa intencionalmente simétrica pode apresentar irregularidades de um lado para o outro.
Painéis planos de grandes dimensões, transições acentuadas, relevos profundos, secções estreitas e outras características invulgares podem tornar o processo de moldagem mais exigente. No entanto, devem ser consideradas como aspetos de engenharia e não como defeitos automáticos. A sua viabilidade deve ser analisada antes da produção do molde, seguida de amostragem e ensaios.
Uma variação visível só deve ser rejeitada quando exceder a norma estética ou dimensional aprovada, alterar a capacidade, interferir com a decoração ou afetar o desempenho da garrafa.
Verticalidade e alinhamento dos acabamentos
A verticalidade nem sempre pode ser avaliada a partir do contorno de uma garrafa personalizada. Uma garrafa assimétrica pode parecer visualmente desequilibrada, mesmo que corresponda ao design pretendido. Algumas garrafas também podem apresentar um corpo ou gargalo deslocado intencionalmente.
Os pontos de referência corretos devem, por conseguinte, ser definidos no desenho técnico. Estes podem incluir a superfície de contacto da base, a linha central da garrafa, a posição final, a superfície de vedação ou outro ponto de referência dimensional.
No caso de uma garrafa vertical convencional, uma inclinação excessiva pode provocar o contacto com os trilhos-guia, um enchimento impreciso, a colocação inclinada da tampa ou um posicionamento irregular no interior de uma embalagem de cartão. No caso de uma garrafa assimétrica personalizada, essa avaliação deve basear-se nos seus pontos de referência aprovados, em vez de se basear apenas na aparência visual de retidão.
Um acabamento é considerado defeituoso quando a sua posição ou ângulo real se situa fora da tolerância acordada e afeta o enchimento, a colocação da tampa, a selagem, a distribuição ou a aparência. Um desvio intencional no gargalo, que corresponda ao projeto aprovado, não constitui um defeito.
Estabilidade da base e superfície de contacto
Uma garrafa personalizada não precisa de ter uma base convencional de aspeto plano. Pode apresentar uma parte inferior profundamente saliente e esculpida, um talão espesso, um centro recuado ou vários contornos decorativos.
O que importa é a superfície que suporta a garrafa. O anel de contacto ou os pontos de apoio previstos devem manter a garrafa estável nas condições previstas de enchimento, rotulagem, embalagem, transporte, exposição e utilização.
Uma garrafa cónica com uma base larga bem concebida pode ser mais estável do que uma garrafa cilíndrica alta. Um perfil de base invulgar também pode ser aceitável, desde que a superfície de contacto externa se mantenha nivelada e uniforme.
Uma garrafa «rocker» é uma garrafa que se move ou balança quando colocada numa superfície plana, apesar de ter sido concebida para ficar em pé de forma estável. Isto pode resultar de um anel de contacto irregular, de um calcanhar deformado, de excesso de vidro, de uma base descentrada ou de um arrefecimento irregular.
Uma condição da base torna-se um defeito funcional quando a garrafa não consegue manter-se em pé como previsto, desloca-se de forma imprevisível numa esteira transportadora, inclina-se no interior da embalagem ou provoca uma distribuição desigual da carga. Uma marca de molde visível, um «push-up» ou um elemento decorativo na base não são automaticamente considerados defeituosos se corresponderem ao desenho aprovado e não afetarem o desempenho.
Enchimento e embalagem de garrafas com formatos personalizados
Nem todas as garrafas personalizadas têm de passar por uma linha de enchimento padrão sem qualquer ajuste. Formatos invulgares podem exigir suportes para garrafas, calhas de guia personalizadas, sistemas de orientação, rodas em estrela específicas, divisórias de cartão com formato específico, tabuleiros moldados ou uma disposição diferente das paletes.
Estes requisitos fazem parte do desenvolvimento de embalagens personalizadas. Não significam que a garrafa em si esteja com defeito.
Se o comprador precisar que a garrafa funcione numa linha de enchimento já existente ou se adapte a uma embalagem de cartão já existente, essas restrições devem ser comunicadas antes do desenvolvimento do molde. O fornecedor poderá então analisar a altura da garrafa, a largura máxima, a posição do gargalo, a área de contacto da base, a superfície do rótulo, o comportamento na transportadora e a orientação na embalagem.
Os ensaios de linha devem ser realizados com a garrafa, o fecho, o rótulo e o equipamento de manuseamento reais, sempre que possível. Também podem ser necessários ensaios de embalagem e transporte para garrafas com corpo cónico, ombros salientes, distribuição de peso irregular ou contacto limitado entre garrafas adjacentes.
Assim que a garrafa for aprovada para uma linha de enchimento e um sistema de embalagem específicos, as unidades de produção que não cumpram os requisitos devido a variações dimensionais, deformações ou instabilidade podem ser consideradas defeituosas. O próprio design atípico não deve ser classificado como um defeito.
As juntas do molde e as marcas na superfície são sempre defeitos?
A maioria das garrafas fabricadas à máquina apresenta linhas de moldagem visíveis. O molde tem de se abrir para que a garrafa moldada possa ser retirada, e os pontos de junção entre as secções do molde deixam linhas de separação no vidro.
Uma linha fina, lisa e devidamente alinhada não constitui, normalmente, um defeito. Torna-se um problema de qualidade quando é acentuada, muito saliente, rachada, mal alinhada ou posicionada de forma a interferir com a vedação ou a decoração.
O excesso de vidro é o material em excesso ao longo da junção do molde. Um excesso acentuado pode dar a sensação de uma saliência afiada. O excesso de vidro à volta do acabamento do gargalo pode interferir com o fecho, enquanto uma costura acentuada no corpo da garrafa pode permanecer visível por baixo de um rótulo ou revestimento.
Guia da Jingbo Group sobre costuras das garrafas de vidro explica em que medida as costuras normais do corpo, da base e do pescoço diferem de fissuras, rebarbas afiadas e desalinhamento do molde.
Outras condições da superfície incluem riscos, arranhões, marcas de arrasto, marcas de corrente, marcas de óleo de molde, depósitos de carbono e áreas ásperas com vidro preso.
Os pequenos arranhões podem afetar principalmente a aparência. Os riscos profundos e as marcas de impacto são mais graves, uma vez que os danos na superfície podem reduzir a resistência prática do vidro. As garrafas podem sofrer estes danos durante o transporte, o manuseamento a granel, a embalagem, o transporte ou a movimentação na linha de enchimento do cliente.
Os recipientes sujos também requerem uma atenção especial. Óleo, fuligem, pó, partículas de vidro, água, resíduos de embalagem ou outros materiais estranhos podem permanecer na superfície ou no interior de uma garrafa. A contaminação interna não pode ser aceite apenas pelo facto de a estrutura do vidro estar em bom estado.
O Orientações da FDA sobre o HACCP para sumos aborda especificamente as medidas de inspeção e controlo destinadas a impedir que fragmentos de vidro entrem nos produtos alimentares. Recomenda a verificação de recipientes vazios e a monitorização das áreas onde as garrafas possam partir-se durante a receção, armazenamento, transporte, enchimento e tamponamento.
O que causa os defeitos nas garrafas de vidro?
Os diferentes defeitos têm origem em diferentes fases de produção.
Durante a fusão e a refinação, o gás retido pode criar bolhas, enquanto os materiais que não foram totalmente fundidos ou a contaminação do forno podem dar origem a imperfeições. A falta de homogeneidade do vidro pode produzir cordões, estrias ou inconsistências de cor.
O peso e a temperatura da gota de vidro afetam a quantidade de vidro que entra na máquina e a facilidade com que este se desloca no interior do molde. Uma gota de vidro incorreta pode resultar em paredes finas, um acabamento incompleto, espessura irregular ou excesso de vidro na base.
Durante o processo de moldagem, a pré-forma deve adquirir a forma interna correta antes de ser transferida para o molde final. Uma pressão de ar, movimento do êmbolo, temperatura do molde, arrefecimento, temporização ou alinhamento incorretos podem causar oscilações, costuras, fissuras, acabamentos malformados e distribuição irregular do vidro.
Após a moldagem, a garrafa deve arrefecer gradualmente num forno de recozimento. Se o vidro interior e o exterior arrefecerem a ritmos muito diferentes, podem permanecer tensões residuais no interior do recipiente. A garrafa pode parecer normal, mas tornar-se mais vulnerável durante o enchimento, a colocação da tampa, as variações de temperatura ou o transporte.
Todo o processo é explicado no guia da Jingbo Group sobre como são fabricadas as garrafas de vidro.
Nem todos os defeitos detetados nas instalações do cliente tiveram origem na fábrica de vidro. Arranhões, lascas, fissuras por impacto, contaminação e vidro partido também podem surgir durante o manuseamento de paletes, o armazenamento em armazém, a descarga de contentores, a despaletização, o transporte, a lavagem, o enchimento e a colocação de tampas.
A identificação da localização do defeito e do padrão de fratura pode, por conseguinte, ajudar a determinar se este resultou da fusão, da conformação, do arrefecimento, do acondicionamento, do transporte ou da linha de enchimento.
Como é que as garrafas de vidro são inspecionadas?
A inspeção da qualidade das garrafas de vidro combina normalmente a inspeção automática, a medição dimensional, os ensaios laboratoriais e a amostragem visual. Nenhum método isolado consegue detetar todos os defeitos possíveis.
Os sistemas de câmaras permitem inspecionar o acabamento, as paredes laterais, o colo e a base. Diferentes ângulos de iluminação ajudam a revelar fissuras, pedras, bolhas, sujidade, defeitos de moldagem e irregularidades na forma. As câmaras internas ou os sistemas óticos podem examinar o interior da garrafa através da abertura, para detetar contaminação e saliências de vidro.
Os medidores mecânicos medem a altura, o diâmetro, a verticalidade, as dimensões do acabamento, a abertura, a rosca e a superfície de vedação da garrafa. A capacidade e o peso podem ser verificados em relação ao desenho aprovado.
Um polariscópio revela padrões de tensão que não são visíveis sob luz normal. O Normas ASTM relativas a recipientes de vidro incluem métodos para exame polariscópico, resistência à pressão interna, resistência ao choque térmico e amostragem de recipientes de vidro.
Os testes de desempenho devem refletir o produto real. ISO 7458 especifica métodos para testar a resistência à pressão interna. ISO 7459 abrange a resistência ao choque térmico e a resistência prolongada ao choque térmico.
Uma garrafa de bebida gaseificada pode necessitar de um ensaio de pressão interna. Um frasco enchido a quente pode exigir uma avaliação de choque térmico. As garrafas embaladas em paletes altas podem necessitar de ensaios de carga vertical. Uma garrafa com decoração de alta qualidade pode exigir verificações adicionais relativas ao revestimento, à impressão, à aderência do rótulo ou à abrasão.
Os defeitos de decoração devem ser registados separadamente dos defeitos no vidro de base. Revestimentos a descascar, cor de pulverização irregular, orifícios na impressão, mau alinhamento, fraca aderência e metalização riscada são problemas de acabamento, mesmo quando a garrafa subjacente está corretamente moldada.
Como devem os compradores definir os critérios de aceitação?
Uma especificação de qualidade deve basear-se na utilização efetiva da garrafa, em vez de em afirmações genéricas como “sem defeitos” ou “vidro de alta qualidade”.”
O comprador deve, em primeiro lugar, confirmar o produto, a temperatura de enchimento, o nível de gaseificação, o tipo de fecho, o método de processamento, o prazo de validade pretendido, a decoração, o método de transporte e os requisitos da linha de enchimento.
O desenho aprovado deve indicar as principais dimensões da garrafa, a capacidade nominal, o peso, o acabamento, a abertura, a superfície de vedação e as tolerâncias relevantes. Os requisitos de desempenho adicionais podem abranger a pressão interna, o choque térmico, a carga vertical, o impacto, as fugas ou a tensão residual.
As expectativas visuais devem ser acordadas com base em amostras representativas. Isto é especialmente importante no caso de garrafas de bebidas transparentes, perfumes, cosméticos e bebidas de gama alta, em que uma marca que não afete a resistência pode, ainda assim, prejudicar a aparência pretendida na prateleira.
O acordo de inspeção deve identificar quais os defeitos que são críticos, graves ou menores para o projeto específico. Deve também definir o plano de amostragem, as condições de inspeção, os níveis de qualidade aceitáveis, os métodos de ensaio e o procedimento a seguir no caso de lotes rejeitados.
Os compradores devem evitar utilizar uma única fotografia de um defeito como referência única. A iluminação, a cor do frasco, a espessura da parede, o ângulo da câmara e a ampliação da imagem podem fazer com que a mesma marca pareça muito diferente.
Uma amostra física aprovada, um desenho técnico, amostras de referência de defeitos e critérios de aceitação por escrito constituem uma base mais fiável para a produção em série.
Quando é que uma garrafa de vidro deve ser rejeitada?
Uma garrafa deve deixar de ser utilizada quando apresentar uma fissura, uma lasca perigosa, uma saliência, uma ponta interna, vidro solto, um orifício minúsculo, uma fuga, um acabamento danificado ou qualquer outro defeito que possa libertar fragmentos ou provocar uma avaria.
Os frascos com paredes excessivamente finas, bolhas abertas, bases instáveis, orifícios obstruídos, acabamentos incompatíveis ou que não tenham superado os testes de pressão e térmicos também devem ser rejeitados para a aplicação pretendida.
Pequenas bolhas fechadas, ligeiros arranhões, cordões finos e linhas de moldagem visíveis podem ser aceitáveis, desde que não afetem o desempenho e se mantenham dentro da norma estética aprovada.
A decisão nunca deve basear-se apenas no facto de o defeito ser ou não fácil de detectar. Uma junção de molde muito visível, mas lisa, pode ser inofensiva, enquanto uma pequena fissura no calcanhar pode ser difícil de detectar e, mesmo assim, representar um risco grave.
Quando for encontrada uma garrafa suspeita, esta deve ser isolada, em vez de ser enchida para um teste informal. Sempre que possível, devem ser registados o lote, o número do molde, a palete, a hora de produção e a localização do defeito. Estas informações ajudam o fabricante a determinar se o problema é isolado ou se está relacionado com uma condição específica de produção.
Conclusão
Os defeitos mais comuns nas garrafas de vidro vão desde pequenas bolhas e marcas superficiais até fissuras, paredes finas, acabamentos danificados, «swing» e fragmentos de vidro no interior.
A decisão correta depende do local onde o defeito surge e se este afeta a aparência, a estanqueidade, o enchimento, a resistência ou a segurança do produto. Especificações claras, amostras representativas, inspeções fiáveis e ensaios específicos para cada aplicação são as melhores formas de distinguir as variações normais do vidro dos defeitos inaceitáveis.
Para um projeto relacionado com garrafas de vidro, contacte a Jingbo Group através de sales@jbtopglass.com indicando o tipo de garrafa, a capacidade, o produto, o tipo de tampa, o processo de enchimento, a decoração, a quantidade e o destino.